Total Solar Eclipse – April 8, 2024

Posted by as Observing Highlights

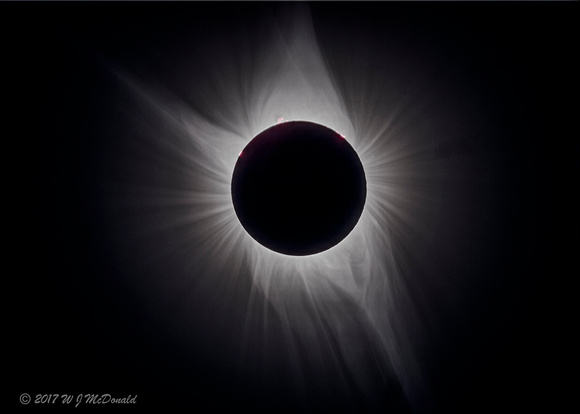
2017 Total Solar Eclipse - plasma streamers at totality - photo by John McDonald
2017 Total Solar Eclipse – plasma streamers at totality – photo by John McDonald

A Total Solar Eclipse is a rare astronomical event (2017 was the last one), and it is even rarer for one to occur in locations that are easy to travel to. Although only a partial eclipse is observable from western Canada, the eclipse tracks diagonally across North America (southwest to northeast) on April 8, 2024. In fact, everyone in North America is within striking distance of being able to observe this amazing event, where the Moon slides in front of the Sun for a few brief minutes, suddenly and totally obscuring the Sun.

If you haven’t observed a Total Solar Eclipse, this is your chance!

Location

The eclipse tracks diagonally across North America, starting in Mazatlan, Mexico, across Texas and other states in the middle of the USA, tracking across southern Ontario, Quebec and the Maritimes. Dedicated eclipse chasers are seeking the best prospects of clear skies by travelling to Mexico, but there are lots of Canadians planning to observe from locations near home, despite the chance of clear skies being poor at that time of year.
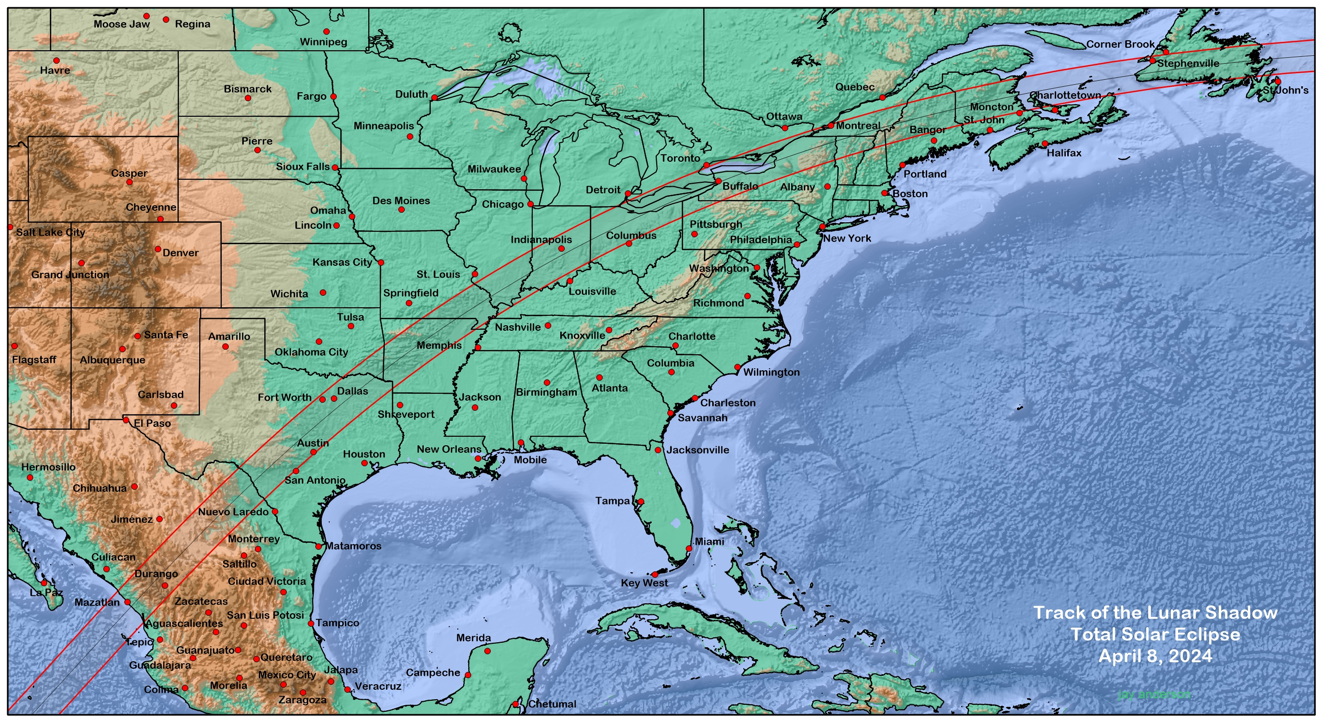
Map of eclipse track across North America
Eclipse track across North America – Jay Anderson, Eclipsophile

Time and Date’s 2024 Total Solar Eclipse site gives all the facts and figures required to find and enjoy the eclipse, including an interactive zoomable map showing the eclipse track and links to livestreams if you want to experience this eclipse from the comforts of home.

What if you can’t travel to the track of totality?
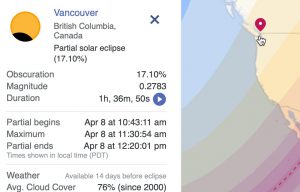
Partial Solar Eclipse from SW British Columbia
Partial Solar Eclipse from SW British Columbia – Time and Date’s interactive eclipse map

You can still see a partial solar eclipse from anywhere in North America. Use Time and Date’s interactive eclipse map to get the calculated timing for the eclipse in the area you plan to observe from. Click and zoom to your area, then click on your observing spot to see a popup telling you how long the eclipse will last and what you will see.

From our location in southwest BC in Canada, a small notch out of the solar disk will appear on eclipse day – obscuring about 17% of the Sun. Not exciting compared with the dramatic Total Solar Eclipse observed from the centreline, but still an interesting apparition to observe, assuming the 76% chance of cloud cover doesn’t prevail!

Weather

Weather always plays a big part in any solar eclipse, so being mobile is key to improving the odds of actually seeing the event should clouds threaten to obscure the Sun at the critical moment. Our very own Jay Anderson (former RASC Journal editor) is a weather expert, and specializes in forecasting weather for solar eclipses. His Eclipseophile website offers sage advice backed up with maps and charts depicting weather prospects for each eclipse happening in the world for the next several years. Read Jay’s analysis of the area you propose to observe from, so you understand how the weather might behave on eclipse day. Topography, elevation changes and local factors play into how the weather evolves throughout the day for a particular locale. Become a local weather expert, and you increase your chances for success!
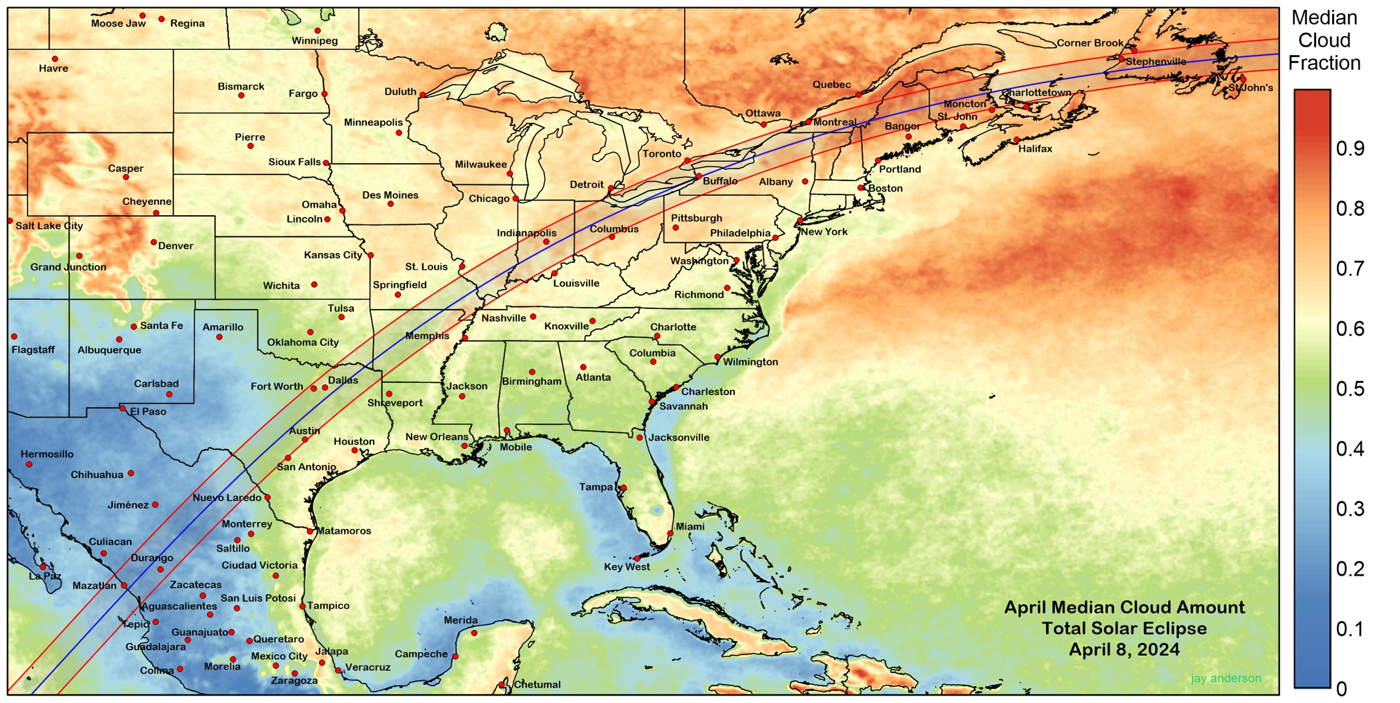
Map showing the probability of clouds along the eclipse track
Probability of clouds along the eclipse track – Jay Anderson, Eclipsophile

Observing

Observing a Total Solar Eclipse is pretty easy, however that said, if you haven’t done it before, it’s nice to have experienced eclipse observers around to help you get the most out of your time under the Moon’s shadow. Obviously the time of total eclipse is the main event, however other things happen beforehand, afterwards, and during an eclipse that are worthwhile.
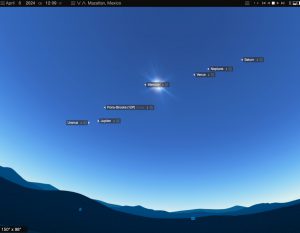
Uranus, Jupiter, Comet Pons-Brooks (12P), Mercury, eclipsed Sun, Venus, Neptune, Saturn - diagram from Starry Night Pro Plus 8
Uranus, Jupiter, Comet Pons-Brooks (12P), Mercury, eclipsed Sun, Venus, Neptune, Saturn – diagram from Starry Night Pro Plus 8

Although the eclipsed Sun is the main target, look around in the darkened sky for planets and other bright celestial objects. There is a good chance eclipse observers will be able to see: Uranus, Jupiter, Comet Pons-Brooks (12P), Mercury, Venus, Neptune and Saturn! Of course, the sky only darkens for the observer if they are in the path of totality, so anyone observing a partial eclipse won’t see any solar system bodies (except the Sun itself).

Be sure to try out any gear you propose to take with you before you leave. Make sure you have proper solar eclipse filters for any binoculars (or your eyes), camera lenses and telescopes you are bringing along. Remember, you only have a few minutes to see totality!

Finally, relax and enjoy the day. Arrive early. Try to manage your stress level. Just sit back in a reclining chair, have your solar glasses handy, and enjoy!

Safely observing a solar eclipse – read about how to safely observe a solar eclipse

DIY Box Pinhole Projector – to safely observe the eclipse with only a box and some aluminum foil!

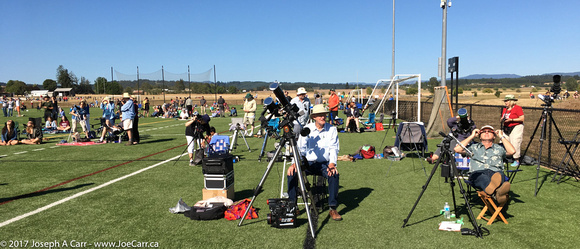
Victoria RASC eclipse chasers on the field observing the 2017 Total Solar Eclipse from Oregon

Photography

If this is your first time experiencing a Total Solar Eclipse, don’t risk missing the eclipse by fiddling with cameras! Observing through (filtered) binoculars is a low risk way to capture the moments of totality in your memory.

For dedicated photographers, using their gear to capture a Total Solar Eclipse can be a right of passage, and has the potential to either be a highlight of your lifetime photography experience (if you succeed) or end up being a point of shame you never want to talk about again (if you fail). Take test photos of the Sun weeks beforehand, so you know your photo gear will work as expected. Always have a backup plan for when (not if) gear breaks, or you simply can’t get it to work properly. Here are some scenarios for consideration for those who are brave enough to want to multitask during totality – a once-in-a-lifetime event (least difficult listed first):

  1. Use a smart phone on automatic mode to take photos or videos of the scene around you
  2. Use a camera and wide angle lens mounted on a tripod to record the landscape, people and the eclipsed Sun (and perhaps stars and planets) in the sky. Take a random series of shots or set the camera to shoot automatically at regular intervals to create a time lapse series.
  3. Use a camera and moderate telephoto lens on a tripod to shoot video of the eclipse in the sky. Keep the telephoto lens short (80mm to perhaps 135mm) to let the eclipsed Sun pass through the frame.
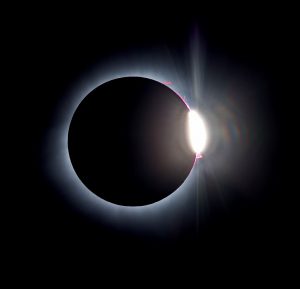
  4. Use a camera and long telephoto lens on a tripod to shoot photographs of the eclipsed Sun. Take photos of the eclipse at the important moments: plasma streamers, Bailey’s Beads, Diamond Ring, totality, and partial eclipse phases.
  5. Use a telescope on a tracking mount with a camera on the back to capture closeup details of the eclipse events such as Bailey’s Beads and the Diamond Ring.

Expansion of the list above, with important details about setup, rehearsing, and special gear you may wish to consider purchasing can be found in this article: How to photograph a solar eclipse, with Alan Dyer – EarthSky.

Travel

RASC Eclipse chasers setup in the Libyan Sahara - March 29, 2006
RASC Eclipse chasers observing from the Libyan Sahara – March 29, 2006

Dedicated eclipse chasers and tour operators have made reservations at least two years ago at all the prime locations for this eclipse along the centreline where the weather is best. That’s not to say last-minute travellers are shut out from experiencing this eclipse – by planning carefully and compromising a bit, it can still work. Flights to hotspots like Mazatlan a couple of days before to a couple of days after April 8th will be fully booked, as will hotels and guest houses. Flying to nearby airports and staying in accommodation outside the centreline can make sense. Driving into the track of totality early on eclipse day can work for many who have not planned ahead.

Many of the USA states the eclipse track runs through will not have crowds of people once you are on country roads. With careful planning using the interactive eclipse and weather maps, it is certainly possible to observe the eclipse from the side of the road, parking lots, campsites, or farmer’s fields. Interstate highways which are in the track of totality will experience congestion, depending on how close to civilization the location is. When driving, expect long delays even for 24 hours or so after an eclipse as all those eclipse chasers try to get home! To avoid that anxiety, plan to stay a day or two longer near your observing site before commencing your road trip home.

Help!

If this will be your first time observing a total solar eclipse, no doubt you have many questions and concerns, and don’t know where to start. The resources presented here may be overwhelming. Please ask any questions you might have about eclipses at Astronomy Cafe, held each Monday evening by RASC Victoria Centre. Your fellow RASC members have observed solar eclipses before…they can help!

If you are reading this from other locations, find your local RASC Centre in eastern Canada which have posted eclipse events and information – Eclipse 2024 RASC.

Resources

Total Lunar Eclipse – May 15/16, 2022

Posted by as Observing Highlights

On Sunday, May 15th, 2022, we will be able to view a total eclipse of the Moon (weather permitting) from Southern Vancouver Island, British Columbia, Canada. The Moon will be in full eclipse after rising from the southeastern horizon, remaining fully eclipsed for about an hour before transitioning into a partial phase as it climbs in altitude and moves to the south. The Lunar Eclipse will end just before midnight.

Enlarge this video to view details for the Lunar Eclipse timing and phases. Depiction of this particular Lunar Eclipse is as viewed from Victoria – generated by Starry Night Pro Plus 8 and captured using Snagit 2022.

This is a perfect opportunity to visually observe this beautiful celestial event, and possibly capture some photographs from a location with an unobstructed view to the east and south.

Total Eclipse Begins8:29PM
Moon Rises8:42PM – probably visible 10-15 mins later
Greatest Eclipse9:12PM
Total Eclipse Ends9:54PM
Partial Eclipse Ends11:51PM
Above Eclipse times are for Pacific Daylight Time (PDT) for the west coast of North America, and are calculated from UT as presented in the Observers Handbook 2022, pages 127-131.
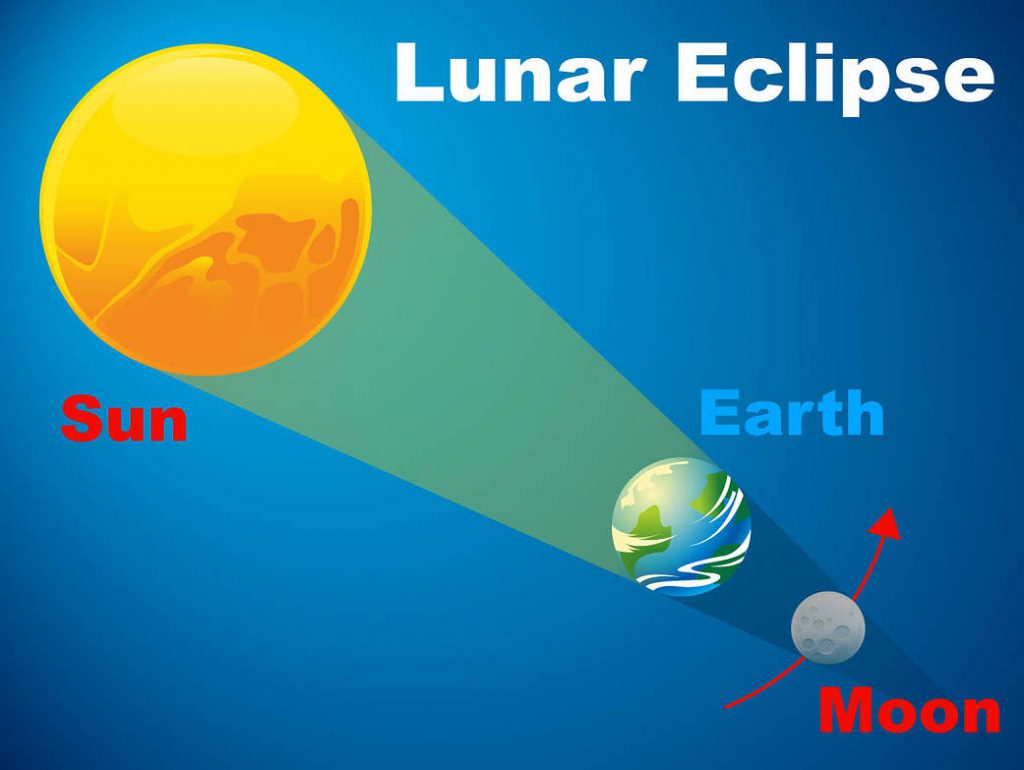
Lunar Eclipse diagram – NASA

What’s Happening

A total lunar eclipse occurs when the Earth comes between the Sun and the Moon. During a lunar eclipse the Moon’s position traverses the Earth’s shadow. The Moon’s first contact with the Earth’s shadow is at the outer band of the shadow called the penumbra. The light falling on the Moon is progressively blocked until at the moment of total eclipse the Moon is completely in the darkest central area of the Earth’s shadow called the umbra. At the point of total eclipse the process starts to reverse itself until the Moon is totally out of the Earth’s shadow.


Glossary

  • limb – the outer edge of the Moon
  • penumbra – the outer band of the Earth’s shadow
  • umbra – the darker central area of the Earth’s shadow
  • partial eclipse – the Moon is positioned within the penumbra
  • total eclipse – the Moon is positioned totally within the umbra

Observing Tips

What do you need?

Everything from your eyes, binoculars and telescope are suitable. Bear in mind this is a long process, so dress warmly and bring a chair if you want to be comfortable.

Find yourself a location that has a clear horizon view to the east and south especially if you wish to view the early fully-eclipsed stage. Observing from a hill will help you spot the rising Moon earlier than if you observe from lower elevations or sea level.

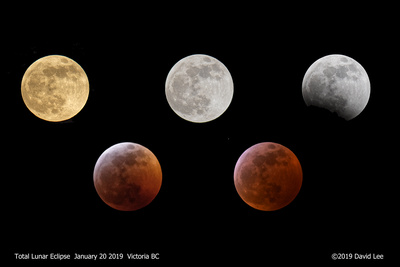
Keep a log of what you see and note the time. Pay attention to how much of the light on the moon is obscured and if there are any colouration changes. During the total eclipse the Moon will take on a deep orange-red colour. The colour of the Moon is a function of contaminants in the atmosphere and varies from year to year.

A good observing project for this long-lasting eclipse will be to observe the craters on the Moon as the eclipse progresses. Craters will be immersed and emerge from the Earth’s shadow on the Moon at times specified in the Observers Handbook 2022, page 131.

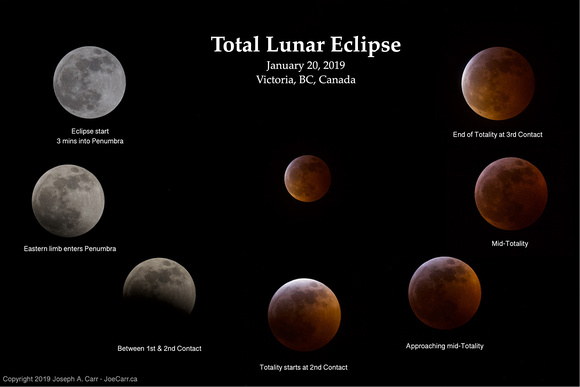
2019 Total Lunar Eclipse from Victoria – composite photo by Joe Carr

Photographic Tips

Equipment

Any camera with the capability of setting shutter speeds and aperture settings manually will do fine. The ability to use interchangeable lenses will be an advantage for more detailed images of the Moon. For the darker parts of the eclipse, eg. totality you should use a tripod support for best results. If you have access to a telescope you can try capturing the event using prime focus techniques through the telescope optics.

Settings

Today’s digital cameras are very sensitive to light reflected by the Moon. Use ISO 400 to ISO 800 and a long telephoto lens or zoom setting. Smartphones and point-and-shoot digital cameras will not produce rewarding photos of the eclipsed Moon, but can be useful for taking panoramic shots of your surroundings which include the eclipsed Moon.

Technique for smartphone cameras

Smartphone cameras typically do not support manual settings, so using them to capture a lunar eclipse will be less rewarding than using more capable cameras. That said, smartphone cameras can be held up to a telescope eyepiece to capture an image of the Moon. Aligning the tiny lens to the eyepiece can be tricky, however there are platforms made to clamp onto an eyepiece barrel which will hold smartphones steady enough to take acceptable photos of the Moon, including the eclipsed Moon.

Technique for interchangeable lens cameras

The simplest eclipse pictures can be taken with manual settings on your camera and a normal lens, preferably supported by a tripod. For best results use a cable release to minimize vibration. Images taken in this fashion result in a small lunar image. This is why it is preferable to use a telephoto lens to photograph the Moon.

For a full frame camera try a 200mm lens or even better, a 500mm lens or higher. You may also use teleconverters to increase magnification, these typically come in 1.4x and 2x strengths. Their downside is they reduce the effective aperture of your optical system. A 1.4x teleconverter will decrease your effective exposure by 1 stop, a 2x teleconverter will decrease your effective exposure by 2 stops. Work out your effective aperture of your optical system ahead of time so you don’t have to think about it on the night of the eclipse.

Note for the smaller sub-full frame sensors of some digital cameras you gain an extra advantage as the focal length of the lens is effectively magnified by a factor. For example a Nikon DX body your 200mm lens would be effectively 300mm.

  • APS-C Nikon DX, Pentax : 1.5x
  • APS-C Canon EF-S : 1.6x
  • Four Thirds : 2x

Example:

 Focal Length ApertureEffective Focal Length
with 2x teleconvertor
Effective Aperture
with 2x teleconvertor
 180mm 2.8 360mm 5.6
 480mm 6.8 960mm 13.6

To achieve any higher magnification than what is stated above you will have to use a telescope at prime focus. For this your manual camera does need to have the capability of using interchangeable lenses. For prime focus you will use the telescope optics as your interchangeable lens. To attach your camera to your telescope you will need two things a T-adapter that fits your camera and a telescope camera adapter that fits your telescope.

The telescope camera adapter is designed to fit in the focusing tube of your telescope and is threaded to accept the T-adapter of your camera. With the magnification involved with telescopic optics it is likely that you will need to use a tracking mount. Preferably the mount should be able to track at lunar speed as opposed to sidereal but if the shutter speeds chosen are shorter than 1 or 2 minutes this is not critical.

Exposure times are the next consideration. The following exposure times are based on a medium ISO setting and an effective aperture that would be common with a long telephoto and teleconverter combination. Exposures may vary with your equipment based on ISO speed and effective aperture. The Danjon Lunar Eclipse Luminosity Scale has been included to provide better guesstimates for totality.

Exposure Times: based on ISO 400
Full Moon1/500 second at f/16
1st Contact1/250 second at f/16 see note 1.
2nd Contact1 second at f/16 see note 2.
Totality
*see table below
L = 4 : 4 seconds at f16  L = 3: 15 seconds at f16  L = 2: 1 minute at f16  L = 1: 4 minutes at f16
3rd Contact1 second at f/16 see note 2.
4th Contact1/250 second at f/16 see note 1.
* Danjon Lunar Eclipse Luminosity Scale
 L = 1dark eclipse; lunar surface details distinguishable only with difficultly
 L = 2deep red or rust coloured eclipse; central part of the umbra dark but outer rim relatively bright
 L = 3brick-red eclipse; usually with a brighter (frequently yellow) rim to the umbra
 L = 4very bright copper-red or orange eclipse, with a bluish, very bright umbral rim

Note 1. 1st and 4th contact times given for the partial phases are biased for the light part of the Moon. Remember you are dealing with vastly different exposures between the light and dark parts of the Moon during eclipse. The bias of about 1 stop minus avoids overexposure of the dominant bright area of the Moon.

Note 2. 2nd and 3rd contact times given for the partial phases are biased for the dark part of the Moon. The bias of about 1 stop plus is a good strategy for negative film not quite so good for slides and digital capture given they don’t tolerate overexposure well.

The exposure times are only recommendations. Remember the cardinal rule about photography … bracket. Always try exposures plus and minus your chosen exposure. This gives you a better chance at getting usable results. Let’s all hope for clear weather. If you have any questions please send email to David Lee at davidflee7331@gmail.com.


David Lee – original text
Joe Carr – updated for 2022
Brenda Stuart – illustrations


More information:

2019 Transit of Mercury

Posted by as Observing Highlights

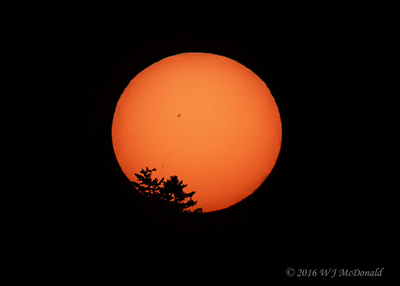
2016 Transit of Mercury - prize-winning photo by John McDonald. Mercury is the tiny dot just above the trees, not the big sunspot in the middle of the Sun!
2016 Transit of Mercury – prize-winning photo by John McDonald. Mercury is the tiny dot just above the trees, not the big sunspot in the middle of the Sun!

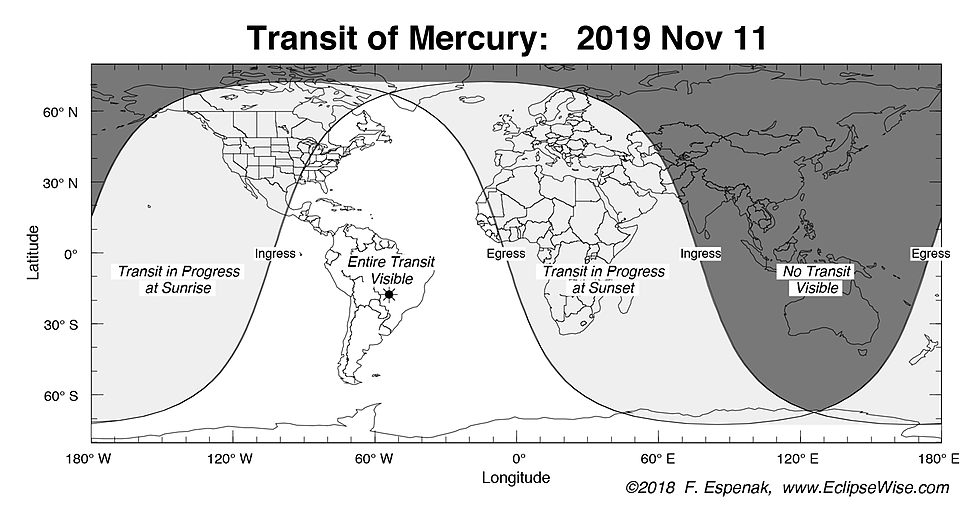
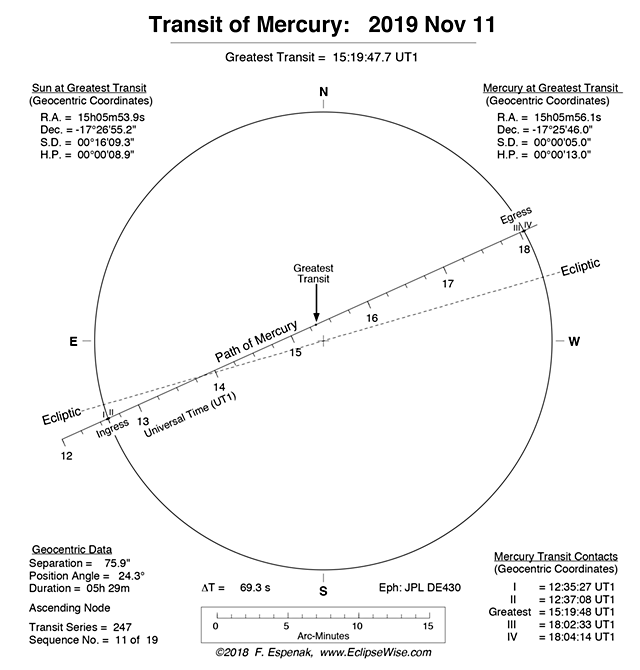
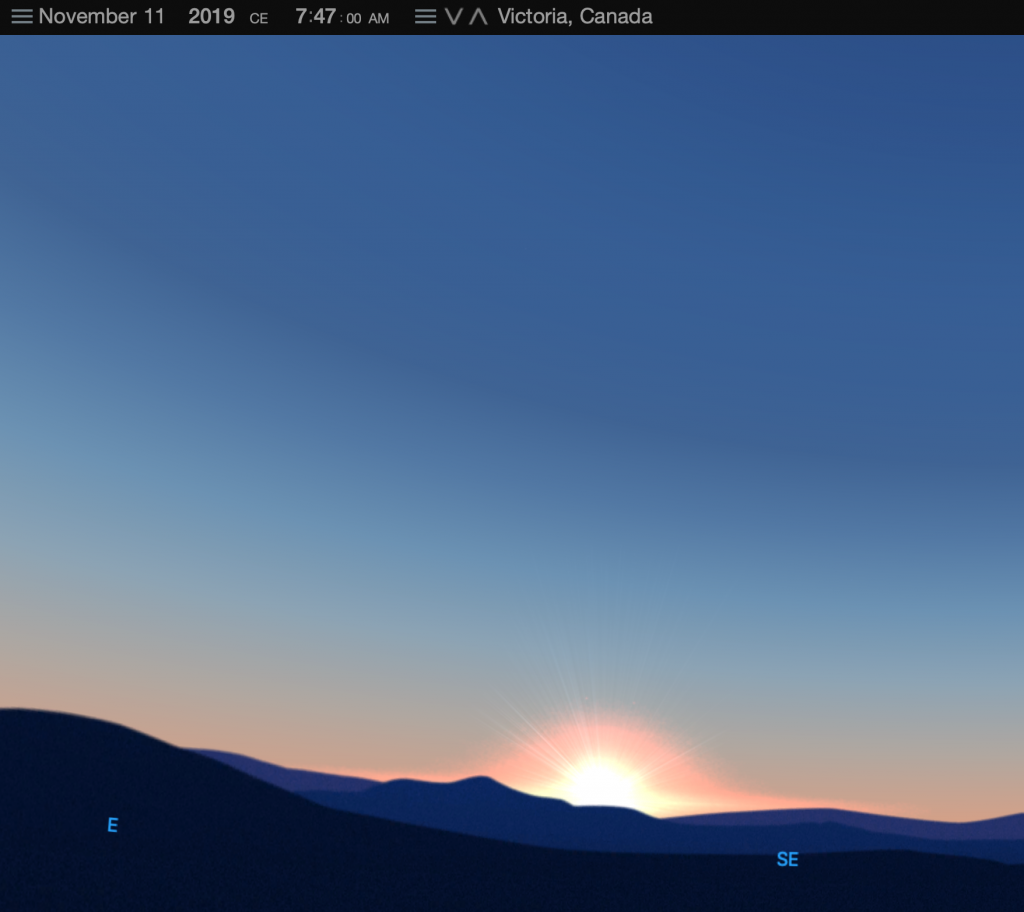
This transit of Mercury will be well underway when the Sun rises at 7:00AM on November 11th. Observers in our location on the west coast of Canada will need to get up early and setup in the dark or pre-dawn, so familiarize yourself with your chosen observing location a few days before this event!

2019 Mercury Transit – gallery of photos and sketches from RASC Victoria Centre members.

Transit timing for Victoria, BC, Canada – Nov 11, 2019 – Pacific Standard Time (PST) – 2 hours & 45 minutes long

  • First contact (ingress, exterior): sun below horizon
  • Second contact (ingress, interior): sun below horizon
  • Sunrise – 7:00AM in the SE
  • Greatest transit: 7:20:26 AM PST
  • Third contact (egress, interior): 10:03:02 AM PST – Sun Altitude 19°
  • Fourth contact (egress, exterior): 10:04:43 AM PST
2019 Mercury Transit world map - Fred Espenak
2019 Mercury Transit world map – Fred Espenak

Observing

2019 Mercury Transit diagram - Fred Espenak
2019 Mercury Transit diagram – Fred Espenak

You should try out any gear you propose to use before Nov 11th. Make sure you have proper solar eclipse filters for any binoculars, camera lenses and telescopes you will be using. Take test photos of the Sun well before this event, so you know your photo gear will work as expected. 

Unlike a total solar eclipse, there is no safe time to take off your solar filters when observing a planetary transit across the Sun. Solar filters must be used the whole time you are looking at the Sun for this event!

Choose a location that has a clear view to the east and southeast, since the transit will be in progress as the Sun rises. Being located on a hill will be an advantage for observing the Sun (and transit) sooner.

Mercury is too small to see without using some magnification, so at a minimum, use solar filters on binoculars or a small telescope to observe with. Mercury will be impossible or extremely difficult to see with unaided eyes or pinhole projectors.

Timing and azimuth of sunrise from Victoria on Nov 11, 2019

Finally, relax and enjoy this event. Sit back in a reclining chair, have your solar glasses and filtered binoculars or telescope handy, and enjoy!

Resources

Total Lunar Eclipse – Jan 20, 2019

Posted by as Observing Highlights

RASC Victoria members’ photos of the 2019 Total Lunar Eclipse

On Sunday, January 20th, 2019, we will be able to view a total eclipse of the Moon (weather permitting). The Moon will be in partial phase after rising from the eastern horizon, and move into full eclipse in evening hours as it climbs in altitude and moves to the southeast. The Total Lunar Eclipse will develop over the course of about 3 hours, will be in Totality for about an hour, and will end just before midnight.

This is a perfect opportunity to visually observe this beautiful celestial event, and possibly capture some photographs from a location with an unobstructed view to the east and south.

ECLIPSE TIMELINE
Eclipse beginsMoon’s eastern limb enters the penumbra6:36 pm PST
Partial eclipse begins – 1st ContactMoon’s eastern limb enters the umbra7:33 pm PST
Total eclipse starts – 2nd ContactMoon entirely in the umbra;
deep orange red
8:41 pm PST
Totality9:12 pm PST
Total eclipse ends – 3rd Contact9:43 pm PST
Partial eclipse ends – 4th ContactMoon’s western limb leaves the umbra10:51pm PST
Eclipse endsMoon leaves the penumbra11:48 pm PST
Above Eclipse times are for Pacific Standard Time (PST) for the west coast of North America, and are calculated from UT as presented in the Observers Handbook 2019, pages 127-29.

What’s Happening

A total lunar eclipse occurs when the Earth comes between the Sun and the Moon. During a lunar eclipse the Moon’s position traverses the Earth’s shadow. The Moon’s first contact with the Earth’s shadow is at the outer band of the shadow called the penumbra. The light falling on the Moon is progressively blocked until at the moment of total eclipse the Moon is completely in the darkest central area of the Earth’s shadow called the umbra. At the point of total eclipse the process starts to reverse itself until the Moon is totally out of the Earth’s shadow.


h

Glossary

  • limb – the outer edge of the Moon
  • penumbra – the outer band of the Earth’s shadow
  • umbra – the darker central area of the Earth’s shadow
  • partial eclipse – the Moon is positioned within the penumbra
  • total eclipse – the Moon is positioned totally within the umbra

Observing Tips

What do you need?

Everything from your eyes, binoculars and telescope are suitable. Bear in mind this is a long process and at this time of year dress warmly and bring a chair if you want to be comfortable.

Find yourself a location that has a clear horizon view to the east and south especially if you wish to view during the late stages.

Keep a log of what you see and note the time. Pay attention to how much of the light on the moon is obscured and if there are any colouration changes. During the total eclipse the Moon will take on a deep orange-red colour. The colour of the Moon is a function of contaminants in the atmosphere and varies from year to year.

A good observing project for this long-lasting eclipse will be to observe the craters on the Moon as the eclipse progresses. Craters will be immersed and emerge from the Earth’s shadow on the Moon at times specified in the Observers Handbook 2019, page 129.

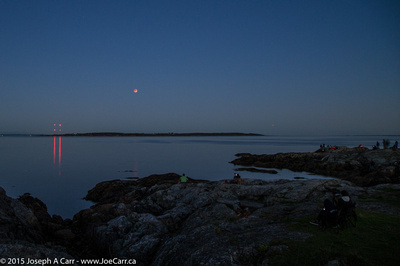
Totally eclipsed Moon over the Salish Sea from Cattle Point – Sep 27, 2015

Photographic Tips

Equipment

Any camera with the capability of setting shutter speeds and aperture settings manually will do fine. The ability to use interchangeable lenses will be an advantage for more detailed images of the Moon. For the darker parts of the eclipse, eg. totality you should use a tripod support for best results. If you have access to a telescope you can try capturing the event using prime focus techniques through the telescope optics.

Settings

Today’s digital cameras are very sensitive to light reflected by the Moon. Use ISO 400 to ISO 800 and a long telephoto lens or zoom setting. Smartphones and point-and-shoot digital cameras will not produce rewarding photos of the eclipsed Moon, but can be useful for taking panoramic shots of your surroundings which include the eclipsed Moon.

Technique for smartphone cameras

Smartphone cameras typically do not support manual settings, so using them to capture a lunar eclipse will be less rewarding than using more capable cameras. That said, smartphone cameras can be held up to a telescope eyepiece to capture an image of the Moon. Aligning the tiny lens to the eyepiece can be tricky, however there are platforms made to clamp onto an eyepiece barrel which will hold smartphones steady enough to take acceptable photos of the Moon, including the eclipsed Moon.

Technique for interchangeable lens cameras

The simplest eclipse pictures can be taken with manual settings on your camera and a normal lens, preferably supported by a tripod. For best results use a cable release to minimize vibration. Images taken in this fashion result in a small lunar image. This is why it is preferable to use a telephoto lens to photograph the Moon.

For a full frame camera try a 200mm lens or something close to this, even better a 500mm lens or higher. You may also use teleconverters to increase magnification, these typically come in 1.4x and 2x strengths. Their downside is they reduce the effective aperture of your optical system. A 1.4x teleconverter will decrease your effective exposure by 1 stop, a 2x teleconverter will decrease your effective exposure by 2 stops. Work out your effective aperture of your optical system ahead of time so you don’t have to think about it on the night of the eclipse.

Note for the smaller sub-full frame sensors of some digital cameras you gain an extra advantage as the focal length of the lens is effectively magnified by a factor. For example a Nikon DX body your 200mm lens would be effectively 300mm.

  • APS-C Nikon DX, Pentax : 1.5x
  • APS-C Canon EF-S : 1.6x
  • Four Thirds : 2x

Example:

 Focal Length ApertureEffective Focal Length
with 2x teleconvertor
Effective Aperture
with 2x teleconvertor
 180mm 2.8 360mm 5.6
 480mm 6.8 960mm 13.6

To achieve any higher magnification than what is stated above you will have to use a telescope at prime focus. For this your manual camera does need to have the capability of using interchangeable lenses. For prime focus you will use the telescope optics as your interchangeable lens. To attach your camera to your telescope you will need two things a T-adapter that fits your camera and a telescope camera adapter that fits your telescope.

The telescope camera adapter is designed to fit in the focusing tube of your telescope and is threaded to accept the T-adapter of your camera. With the magnification involved with telescopic optics it is likely that you will need to use a tracking mount. Preferably the mount should be able to track at lunar speed as opposed to sidereal but if the shutter speeds chosen are shorter than 1 or 2 minutes this is not critical.

Exposure times are the next consideration. The following exposure times are based on a medium ISO setting and an effective aperture that would be common with a long telephoto and teleconverter combination. Exposures may vary with your equipment based on ISO speed and effective aperture. The Danjon Lunar Eclipse Luminosity Scale has been included to provide better guesstimates for totality.

Exposure Times: based on ISO 400
Full Moon1/500 second at f/16
1st Contact1/250 second at f/16 see note 1.
2nd Contact1 second at f/16 see note 2.
Totality
*see table below
L = 4 : 4 seconds at f16  L = 3: 15 seconds at f16  L = 2: 1 minute at f16  L = 1: 4 minutes at f16
3rd Contact1 second at f/16 see note 2.
4th Contact1/250 second at f/16 see note 1.
* Danjon Lunar Eclipse Luminosity Scale
 L = 1dark eclipse; lunar surface details distinguishable only with difficultly
 L = 2deep red or rust coloured eclipse; central part of the umbra dark but outer rim relatively bright
 L = 3brick-red eclipse; usually with a brighter (frequently yellow) rim to the umbra
 L = 4very bright copper-red or orange eclipse, with a bluish, very bright umbral rim

Note 1. 1st and 4th contact times given for the partial phases are biased for the light part of the Moon. Remember you are dealing with vastly different exposures between the light and dark parts of the Moon during eclipse. The bias of about 1 stop minus avoids overexposure of the dominant bright area of the Moon.

Note 2. 2nd and 3rd contact times given for the partial phases are biased for the dark part of the Moon. The bias of about 1 stop plus is a good strategy for negative film not quite so good for slides and digital capture given they don’t tolerate overexposure well.

The exposure times are only recommendations. Remember the cardinal rule about photography … bracket. Always try exposures plus and minus your chosen exposure. This gives you a better chance at getting usable results. Let’s all hope for clear weather. If you have any questions please send email to David Lee at davidflee7331@gmail.com.


David Lee – original text
Joe Carr – updated for 2019
Brenda Stuart – illustrations


More information:

September 17 2018: 21P Comet Giacobini-Zinner

Posted by as Observing Highlights

From an email post to RASC Victoria on September 17 2018: 21P Comet Giacobini-Zinner

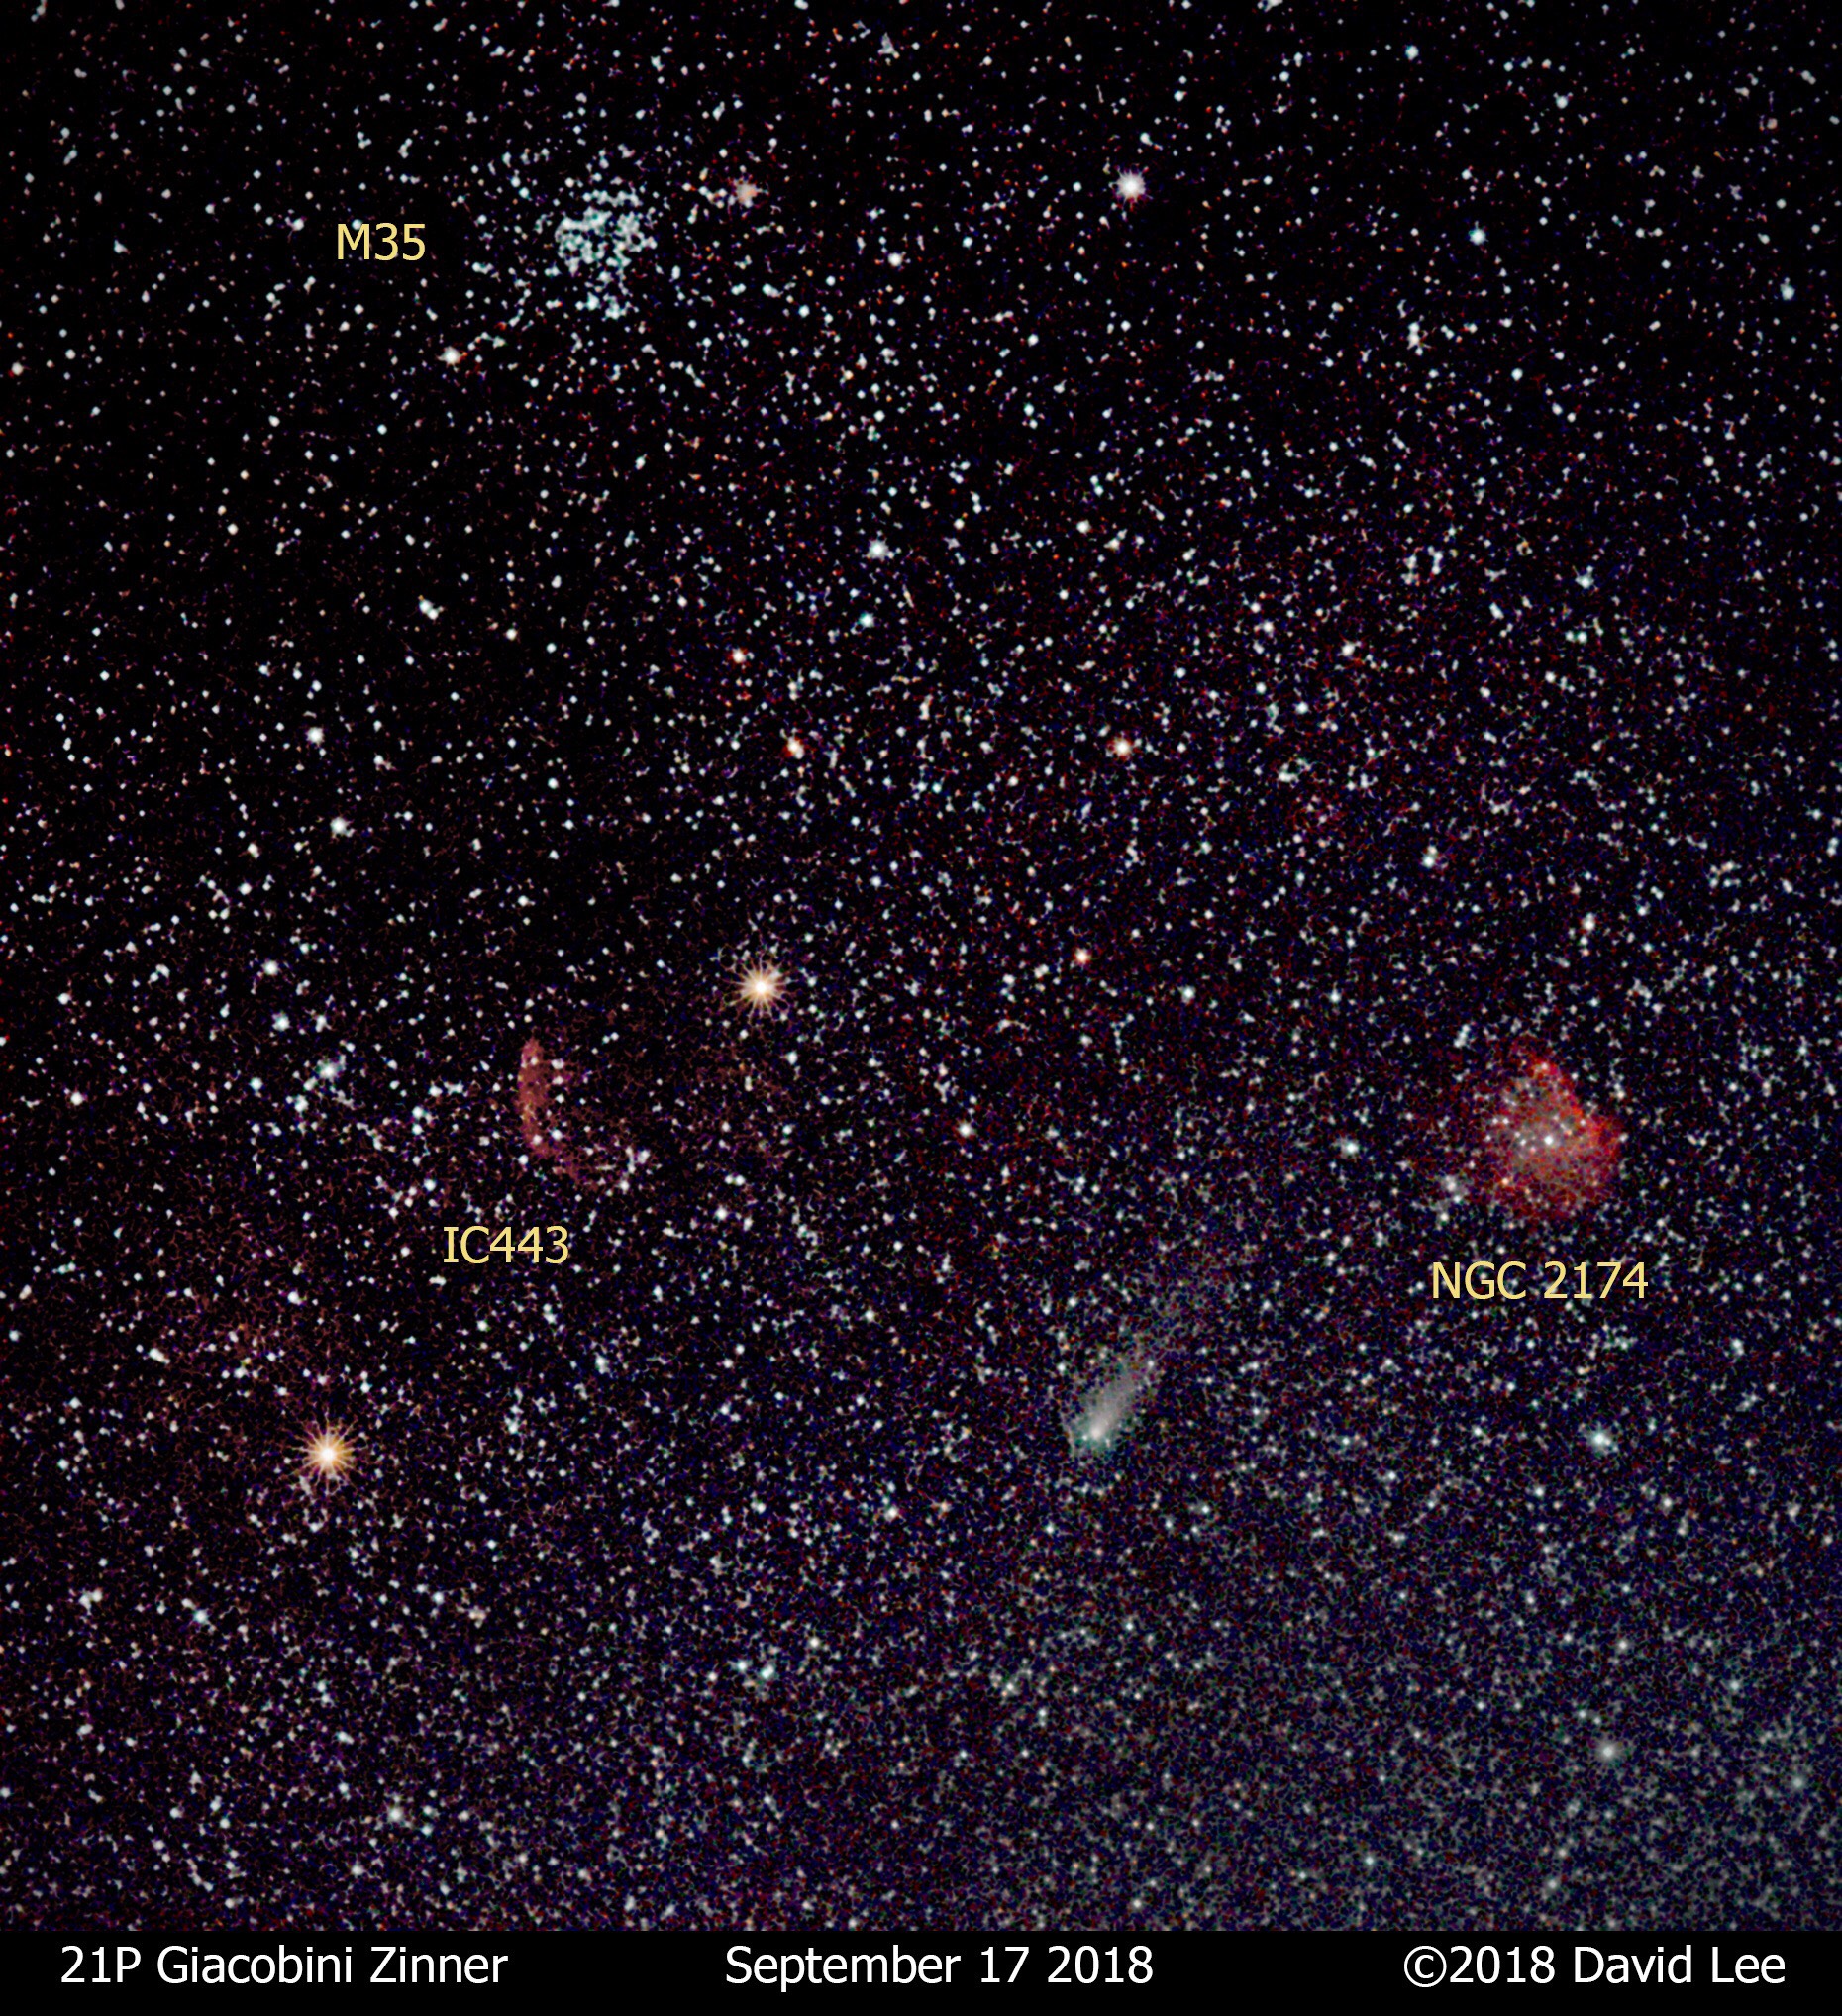
It was clear enough last night to get a quick snapshot of the comet from the driveway. I had to get the light stand out with a large sheet of black foamcore to block the streetlight nearby. Light pollution was a challenge but I was able to collect 16 one minute images and do a simple stack in Maxim DL. It’s nicely framed by the open cluster M35 just underneath Auriga, IC443 a supernova remnant in Gemini and NGC2174 a HII emission nebula in Orion. Hopefully I’ll be able to get a better shot from darker skies this week :-)

David Lee

A response from Bill Weir:

That’s really nice David. In the early morning when the comet was within M35 I took the chance and drove to the cricket pitch in Metchosin even though 90% of the sky was cloud. This is my write up of the event.

Well that was fun and reconfirmed to me the value of being prepared. Around 0030hrs PDT I was putting the dogs out and looked up and saw a clear patch of sky heading to the east. I grabbed my eyepiece case, jumped in the car and headed to the cricket pitch as the 6 inch dob had already been in the car for days. It took over an hour for the clearish patches to make their way across the sky but that was OK as it gave me a chance to collimate the scope and check out various deep sky objects along the way. Eventually the left toe of Gemini (their toe) peaked through the clouds and I was able to pick out M35 with the 15X70 binos. No comet was visible so I panned about but couldn’t make out anything. Through the scope at 38X with a 31N it was a beautiful view of M35 and NGC 2158 but no comet was visible in the area. I upped the power to 60X and focused on M35 still nothing until I began to notice a fuzziness within the eastern side of the cluster to the SE(?) of a beautiful curving chain of stars. As I advanced though 120x and then finally to 200X it became apparent this was the comet fully within this beautiful cluster! It was similar to this image except move the comet a bit down and to the left.

http://spaceweathergallery.com/indiv_upload.php?upload_id=148036&PHPSESSID=mkimbs7bfvk4n5pikdrfkqtpk3

In the end it reminded me in a way of the planetary nebula NGC 2438.

Shortly after drinking in the view clouds moved in and the show was over. It wasn’t my best comet observation by far due to low altitude in the sky and being over Victoria to the south east. That was OK though because my feet were freezing as good footwear was the one thing I neglected as I raced out the door. Drove off the field at 0215 PDT and was soon tucked in bed. Many like the phrase “make hay when you can” but I prefer,”you can’t dance at the party if you don’t show up”. This means go out even if the weather doesn’t seem optimal or you won’t see things at all.

Bill in Metchosin

Mars Opposition 2018

Posted by as Observing Highlights

On Friday July 27th 2018 Mars will make it’s closet approach to Earth in 15 years.

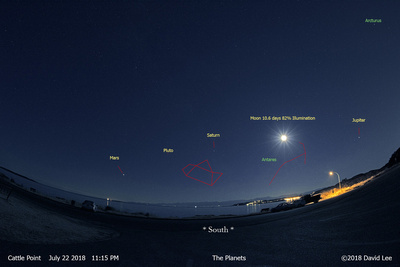
RASC Victoria Centre: David Lee &emdash; The Planets at Cattle Point
Planets visible from Cattle Point – by David Lee

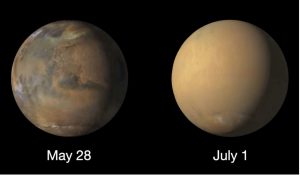
This occurs when Mars, Earth and the Sun are aligned with Mars located on the opposite side of Earth from the Sun. Mars will slowly rise on the eastern horizon late that evening … not the best viewing situation. A major dust storm developed on May 31st and has obscured details of the Martian surface. (see image below) Surface details will gradually re-emerge later this Summer as the dust storm subsides.

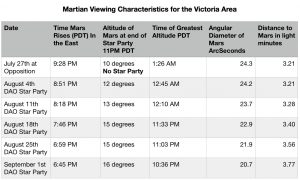
The viewing characteristics of Mars as seen from the Victoria area are tabulated below for the remaining DAO Saturday Night Summer Star Parties of the season.

Notice that the appearance of Mars (angular diameter) will decrease very slowly after the opposition. One week following opposition the angular diameter will only be 0.5% smaller but Mars will rise earlier and surface features may start to re-emerge.

Evening viewing conditions of Mars therefore will be more favourable and convenient in August.
Consider attending a DAO Saturday Night Star Party this August.
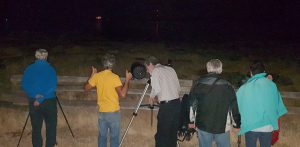
Volunteers of RASC will be there to share the night sky with their telescopes.
Click here to obtain free Star Party tickets. Note: No Star Party on July 28th.

In the Victoria area the best evening views of Mars are obtained with an unobstructed view of the southeast such as: Cattle Point Urban Dark Sky Park, Clover Point, Island View Beach, and Mount Tolmie. In the late evening Mars will appear fairly low in the southeast as an exceptionally bright red dot. It is hard to miss. Check it out.

Click here to learn more about the Mars 2018 Opposition and observing hints.
Click here to see images of the 2018 Martian Dust Storm.


The Surface of Mars Before and After the Martian Dust Storm (from NASA Mars Reconnaissance Orbiter)

Inaugural Transboundary Fireworks Festival

Posted by as Observing Highlights

By Reg Dunkley

On a mild July 4th evening about 10 RASCals assembled at Cattle Point Urban Dark Sky Park for the Inaugural Transboundary Fireworks Festival. Attendees were rewarded with spectacular views of two July Forth Fireworks shows. Between 10 PM and 10:15 PM Friday Harbour on San Juan Island took the stage. Terrain blocked some of the low level displays but the airborne clusters filled the field of view of most scopes. The main event occurred between 10:30 PM and 10:50 PM when Fisherman Bay on Lopez Island launched their salvo. Although slightly farther away we enjoyed an unobstructed view of the Lopez conflagration.

A variety of scopes were deployed including refractors, newtonian reflectors, spotting scopes, binoculars as well as an 8 inch Schmidt Cassegrain. In order to squeeze in the view RASCals resorted to lower magnifications. This confirmed that you do not need a big scope to enjoy the show.

It took about one minute 20 seconds for the muffled booms to arrive on the scene. This soundscape combined by the spontaneous whoops and ah’s from the RASCals added to the party atmosphere. It would have been nice if we were able to transition from the fireworks to star gazing … but clouds intervened.

Should we try again next year? Randy Atwood’s attached photo captured Chris Aesoph giving it two thumbs up! So I reckon that is a yes. It was a RASCal Worthy event.

The attention the photons received was well deserved.

Thanks to all the attendees.

Total Lunar Eclipse – Jan 31, 2018

Posted by as Observing Highlights

Total Lunar Eclipse on Sep 27, 2015 from Victoria
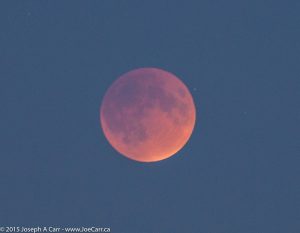
Total Lunar Eclipse on Sep 27, 2015 from Victoria – photo by Joe Carr

On Wednesday, January 31st, weather willing, we will be able to view a total eclipse of the Moon. The Moon will move into full eclipse in the early hours of the morning and will be in partial phase in the western sky as the Sun rises. The Total Lunar Eclipse will develop over the course of about 3 hours. It’s a perfect opportunity to capture some snapshots of the event. Read further to find out what happens during the eclipse and how to capture it photographically.


 E C L I P S E   T I M E L I N E
Moon below the horizon Moon’s eastern limb enters the penumbra 2:51 am PST
Partial eclipse begins – 1st Contact Moon’s eastern limb enters the umbra 3:48 am PST
Total eclipse starts – 2nd Contact Moon entirely in the umbra;
deep orange red
4:52 am PST
Totality 5:30 am PST
Total eclipse ends – 3rd Contact 6:08 am PST
Partial eclipse ends – 4th Contact Moon’s western limb leaves the umbra 7:11 am PST
Sunrise 7:48 am PST – approximate
Eclipse ends Moon leaves the penumbra 8:09 am PST


What’s Happening

A total lunar eclipse occurs when the Earth comes between the Sun and the Moon. During a lunar eclipse the Moon’s position traverses the Earth’s shadow. The Moon’s first contact with the Earth’s shadow is at the outer band of the shadow called the penumbra. The light falling on the Moon is progressively blocked until at the moment of total eclipse the Moon is completely in the darkest central area of the Earth’s shadow called the umbra. At the point of total eclipse the process starts to reverse itself until the Moon is totally out of the Earth’s shadow.


Glossary

  • limb – the outer edge of the Moon
  • penumbra – the outer band of the Earth’s shadow
  • umbra – the darker central area of the Earth’s shadow
  • partial eclipse – the Moon is positioned within the penumbra
  • total eclipse – the Moon is positioned totally within the umbra
Above Eclipse times are for Pacific Standard Time (PST) for the west coast of North America, and are calculated from UT as presented in the Observers Handbook 2018, pages 126-27.

Observing Tips

What do you need?

Everything from your eyes, binoculars and telescope are suitable. Bear in mind this is a long process and at this time of year dress warmly and bring a chair if you want to be comfortable.

Find yourself a location that has a clear horizon view of the west especially if you wish to view during the late stages.

Keep a log of what you see and note the time. Pay attention to how much of the light on the moon is obscured and if there are any colouration changes. During the total eclipse the Moon will take on a deep orange-red colour. The colour of the Moon is a function of contaminants in the atmosphere and varies from year to year.


Photographic Tips

Equipment
Any camera with the capability of setting shutter speeds and aperture settings manually will do fine. The ability to use interchangeable lenses will be an advantage for more detailed images of the Moon. For the darker parts of the eclipse, eg. totality you should use a tripod support for best results. If you have access to a telescope you can try capturing the event using prime focus techniques through the telescope optics.

Settings
Today’s digital cameras are very sensitive to light reflected by the Moon. Use ISO 400 to ISO 800 and a long telephoto lens or zoom setting. Smartphones and point-and-shoot digital cameras will not produce rewarding photos of the eclipsed Moon, but can be useful for taking panoramic shots of your surroundings which include the eclipsed Moon.

Technique
The simplest eclipse pictures can be taken with manual settings on your camera and a normal lens, preferably supported by a tripod. For best results use a cable release to minimize vibration. Images taken in this fashion result in a small lunar image. This is why it is preferable to use a telephoto lens to photograph the Moon. For a 35mm camera try a 200mm lens or something close to this, even better a 500mm lens or higher. You may also use teleconvertors to increase magnification, these typically come in 1.4x and 2x strengths. Their downside is they reduce the effective aperture of your optical system. A 1.4x teleconvertor will decrease your effective exposure by 1 stop, a 2x teleconvertor will decrease your effective exposure by 2 stops. Work out your effective aperture of your optical system ahead of time so you don’t have to think about it on the night of the eclipse.

Example:


 Focal Length  Aperture Effective Focal Length
with 2x teleconvertor
Effective Aperture
with 2x teleconvertor
 180mm  2.8  360mm  5.6
 480mm  6.8  960mm  13.6


To achieve any higher magnification than what is stated above you will have to use a telescope at prime focus. For this your manual camera does need to have the capability of using interchangeable lenses. For prime focus you will use the telescope optics as your interchangeable lens. To attach your camera to your telescope you will need two things a T-adapter that fits your camera and a telescope camera adapter that fits your telescope. The telescope camera adapter is designed to fit in the focusing tube of your telescope and is threaded to accept the T-adapter of your camera. With the magnification involved with telescopic optics it is likely that you will need to use a tracking mount. Preferably the mount should be able to track at lunar speed as opposed to sidereal but if the shutter speeds chosen are shorter than 1 or 2 minutes this is not critical.

Exposure times are the next consideration. The following exposure times are based on a medium speed film and an effective aperture that would be common with a long telephoto and teleconverter combination. Exposures may vary with your equipment based on ISO speed of film used and effective aperture. The Danjon Lunar Eclipse Luminosity Scale has been included to provide better guesstimates for totality.


Exposure Times: based on ISO 400
Full Moon  1/250 second at f/16
1st Contact 1/125 second at f/16 see note 1.
2nd Contact 2 seconds at f/16 see note 2.
Totality
*see table below
L = 4 : 8 seconds at f16
L = 3: 30 seconds at f16
L = 2: 2 minutes at f16
L = 1: 8 minutes at f16
3rd Contact 2 seconds at f/16 see note 2.
4th Contact 1/125 second at f/16 see note 1.
* Danjon Lunar Eclipse Luminosity Scale
 L = 1 dark eclipse; lunar surface details distinguishable only with difficultly
 L = 2 deep red or rust coloured eclipse; central part of the umbra dark but outer rim relatively bright
 L = 3 brick-red eclipse; usually with a brighter (frequently yellow) rim to the umbra
 L = 4 very bright copper-red or orange eclipse, with a bluish, very bright umbral rim


Note 1. 1st and 4th contact times given for the partial phases are biased for the light part of the Moon. Remember you are dealing with vastly different exposures between the light and dark parts of the Moon during eclipse. The bias of about 1 stop minus avoids overexposure of the dominant bright area of the Moon.

Note 2. 2nd and 3rd contact times given for the partial phases are biased for the dark part of the Moon. The bias of about 1 stop plus is a good strategy for negative film not quite so good for slides and digital capture given they don’t tolerate overexposure well.

The exposure times are only recommendations. Remember the cardinal rule about photography … bracket. Always try exposures plus and minus your chosen exposure. This gives you a better chance at getting usable results. Let’s all hope for clear weather. If you have any questions please send email to David Lee at davidflee7331@gmail.com.


David Lee – original image and text
Joe Carr – updated for 2018
Brenda Stuart – illustrations

Lunar “X” during 2018

Posted by as Observing Highlights

Lunar X feature - photo by Michel Michaud
Lunar X feature – photo by Michel Michaud

by Michel Michaud, RASC Victoria Centre Observing Co-chair & Librarian

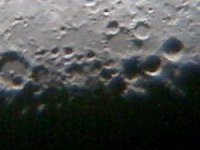
The Lunar X is a claire-obscure effect in which light and shadow creates the appearance of a letter “X” on the rim of the Blanchinus, La Caille and Purbach craters. The X is visible only for a few hours before the first quarter slightly below the lunar terminator. Near the X, the lunar V is also visible, formed by Ukert crater and several other small craters.

If you never had the chance to view the Lunar X, also known as the Werner X, there are several time this year that feature could be visible from Victoria. The time predict the beginning of the event and all in LOCAL TIME.

  • 23 January 2018, 2042 (8:42 pm) – Tuesday evening event
  • 23 March 2018, 2357 (11:57 pm) – Friday evening event
  • 21 May 2018, 0002 (12:02 am) – Monday evening event
  • 19 July 2018, 2314 (11:14 pm) – Thursday evening event
  • 16 September 2018, 2332 (11:32 pm) – Sunday evening event
  • 14 November 2018, 0059 (12:59 am) – Wednesday evening event

Werner “X” observation – 2014

Press Release: RASC Victoria – August 21 Eclipse Viewing

Posted by as Observing Highlights, Special Events

RASC VICTORIA CENTRE ANNOUNCES AUGUST 21 ECLIPSE VIEWING IN VICTORIA

Viewing planned for Royal BC Museum, Mount Tolmie & Metchosin Cricket Pitch

Members of the Victoria Centre of the Royal Astronomical Society of Canada will be setting up their solar telescopes in three locations around Greater Victoria for public viewing of the solar eclipse on the morning of Monday August 21.

Because looking directly at the Sun at any time is dangerous without proper protection, the telescopes at these events will be equipped with shielding to allow members of the public to safely see the eclipse. While the eclipse will be total in some parts of the United States, the eclipse in Victoria will be only a partial eclipse, where parts of the Sun will always be visible. The August 21 eclipse in Victoria will begin at 9:08 a.m. and end at 11:38 a.m. At 10:20 a.m., the Moon will block around 90 percent of the Sun as seen from Victoria.

RASC members will be setting up their telescopes during the eclipse on the morning of August 21 in front of the Bell Tower at the Royal B.C. Museum at 675 Belleville Street in Victoria, at the Cricket Pitch in Metchosin behind the Fire Hall at 4400 Happy Valley Road, and at Mount Tolmie Park off Cedar Hill X Road in Saanich, which can be reached by going up Mayfair Drive to the top of the Mountain, where telescopes will be located on the water reservoir facing south.

The University of Victoria will hold an open house for eclipse viewing that morning open to the public at the UVic Observatory on the fifth floor of the Bob Wright Building.

There will be no public eclipse viewing at the Dominion Astrophysical Observatory.

For more information on the Victoria Centre of the RASC, please go to our website at https://victoria.rasc.ca
For UVic eclipse information, see http://www.uvic.ca/science/physics/about/home/news/current/solar-eclipse.php

-30-

Contact person: Ken Mallory outreach@victoria.rasc.ca 250-598-8628